
I love a great steak! Truth be told, though, for most of my adult life, I have not been making a great steak. I tried. Many different ways. It definitely wasn’t for lack of trying. I tried many different seasonings, many different cuts of meat, many different ways of cooking it, and the only thing consistent is that it was never a perfect steak. Time’s are a’changin’ because I am going to show you how to make a consistently amazing steak ever time.
A Cut Above
So what kind of cut should you use to make a really good steak? You’re going to hear a lot of suggestions, but here are my thoughts:
T-Bone / Porterhouse
The T-Bone/Porterhouse is the Aston Martin of steaks in my world. You’ve got both form and function. (For clarity, the T-bone is cut from the front part of the Short Loin and the Porterhouse is cut from the back part.)
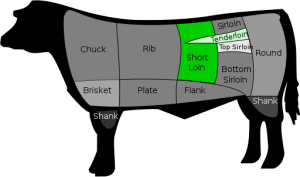
On one side of the T-shaped bone is a Strip Steak (often called a New York Strip). On the other, the Tenderloin (or as it is fondly known, the Filet Mignon or Filet). As the Porterhouse is cut from the rear of the Short Loin, you’re going to get a larger Tenderloin than on a T-bone, so keep that in mind when choosing between a T-bone and a Porterhouse.
Whichever you choose, with the bone-in, you’re going to get a ton of added flavor on this puppy. But like an Aston Martin, it may be more than you need on a day-to-day basis. That’s a lot of steak! But it’s a great cut and one to consider if you’re cooking for more than one person.
Tenderloin (Filet Mignon)
Everyone’s heard of a Filet Mignon and rightfully so. It is a great cut of meat that is not only lean, but also really tender when cooked properly. Also, more on the premium side (which comes with a premium price tag), this would be one cut to definitely look at if you’re making a fancy (or, say a Valentine’s Day) dinner for someone.

New York Strip
On the other side of the tracks (or T-bone) is the Strip Steak (or New York Strip). This would be my everyday go-to steak. It tends to be a little more affordable, it’s tender and it’s a nice size steak for a steak dinner…and it is soooo flavorful. Plus, it’s known for a fantastic, uniform marbling of fat. Why is that important? When you have a consistent marbling of fat, it will melt into the steak more evenly keeping it moist and tender, while giving it added flavor to boot!
Top Sirloin
Another good choice is the Top Sirloin. While it may not be quite as tender as the other cuts, you’re still going to get a quality steak and it’s a great option if you want a great steak and save a little change in the process.
It, too, has a nice marbling of fat, although it’s generally not as consistent throughout the cut as a New York Strip. But again, it is a great choice for an everyday steak and if you’re grocery store is anything like mine, they frequently run sales on both the Top Sirloin and the New York Strip…so keep an eye out for that. I love looking to see what is on sale and plan a meal around it.
Seasoning is Simple
I cannot stress enough that you don’t have to go crazy on marinades or seasonings to get a great steak. Salt and Pepper will always do the trick.
Simplicity is Best
I am not much for marinades on a nice steak. They change the flavor too much. If you have a cheaper cut of meat, of course, a marinade works great for tenderizing and transforming a less desirable cut into tasty steak. But if you’re using one of the cuts above (haha! Pun not intended), then keep the marinade in the cupboard because you don’t need it and it will ruin your steak’s potential.
Seriously, salt and pepper is all you need. If you want to add some additional flavoring, I recommend that you keep it mainstream. Remember, you don’t need to change the taste of a really good steak. It is already really good. But if you were to use a steak seasoning that is primarily salt and pepper (like a Canadian/Montreal Seasoning) that has a little garlic powder and paprika added, I’d be OK with that. 😉 It’s not going to drastically change the taste of the steak.
The one exception to the mainstream rule is my buddy, Chef Demal Mattson’s, steak seasoning. I was lucky that he whipped up a batch of seasoning for me when we filmed his Food Network Award Winning Crab Cakes in Atlanta last year. It is a really complex combination of salt and spices that does a superb job on a good steak. It doesn’t overwhelm the steak in any way and really helps to complement the already great flavor, adding a bit of complexity to it. Maybe you can help me convince him to show us his recipe???
Time is Your Friend
I really do encourage you to give the seasoning some time to work its magic. There’s a lot of science that goes into it; it’s not arbitrary. By letting your steak sit seasoned in the fridge for 8 hours or overnight, you’re allowing a couple of things to happen.
First, the salt is going to pull the moisture from the inside of the steak to the surface. Why would I want to pull the moisture out, you ask? Well, when it comes to the surface, it melts the salt and that gets pulled back into the steak distributing it evenly throughout.
Second, the dryness in the refrigerator helps to dry the outside of the steak. This is good because a dry steak will give you a great sear with incredible grill marks.
The Heat is On
So you have the perfect cut and it is seasoned perfectly. Time to cook it up. But how? And for how long?
The Reverse Sear
I used to just throw a steak on the BBQ grill cranked all the way up and would try and cook the steak until it is was done. There were several problems with this. The end result: the outside would get burned and the inside was not quite done.
Ever since I discovered the reverse sear, I have been in hog heaven. It is a practical and easy way to make a consistently good steak every time.
The process is simple, cook it most of the way slowly. Then finish it off on a screaming hot grill to get it perfectly seared on the outside.
If you live in the city, have an apartment, it’s winter, sometimes you don’t have the luxury of an outdoor BBQ grill. Do not worry…enter the cast iron grill pan. I love this thing and it will produce a perfect steak! We start the steak in the oven and sear it on the cast iron grill pan.
If you have an outside BBQ grill or your apartment complex has a community grill, you can actually cook the steak entirely on the grill. But, it’s time to get more creative with how you use your grill. Those dials are there for a reason. Turn one side of the grill on high and keep the other side off.
You’ll start your steak on the side of the grill that is off…so you’re indirectly cooking it at a lower heat. Then you finish it off on the hot side for the perfect sear.
Perfection is a Matter of Degrees
It is not how long you cook a steak, it is how many degrees that truly determines when your steak will be perfect.
And that depends on how you like your steak…rare, medium, well…or somewhere in between. No matter how you like it, that corresponds to a specific temperature:

These vary slightly within a few degrees depending on where you look, but the USDA recommends at least 145°F.
So how do you cook it perfectly using the Tiny Kitchen Big Taste reverse sear method? The Rule of 5!
The Tiny Kitchen Big Taste Rule of 5
You are going to need 5 five-degree searing segments, for a total of 25 degrees. So find how you like your steak cooked above and subtract 25 degrees. That’s when you will take your steak out of the 275°F oven to sear it on the cast iron grill pan. Here’s a cheat sheet:

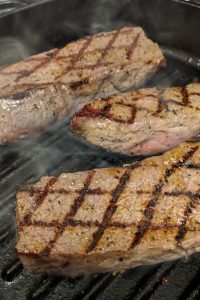
5°F (sear): Sear it until the temperature rises 5 degrees and give the steak a quarter turn.
5°F (rotate, sear): Sear it another 5 more degrees and flip it over. Be sure to admire those beautiful diamond grill marks.
5°F (flip, sear): Sear it 5 degrees more and another quarter turn.
5°F (rotate, sear): Sear it 5 degrees more and take it off the grill and place it on a plate.
5°F (rest): At this point it will be 5 degrees shy of how you like your steak. Do not worry…and DO NOT cut into it. The residual heat will continue to cook the steak at least another 5 degrees…hitting your desired temperature.
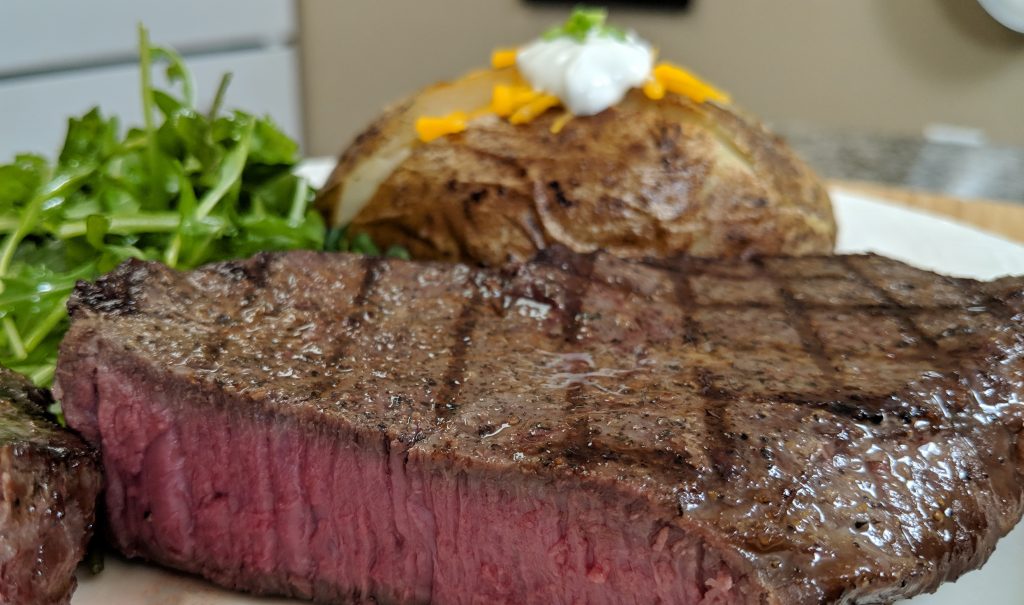
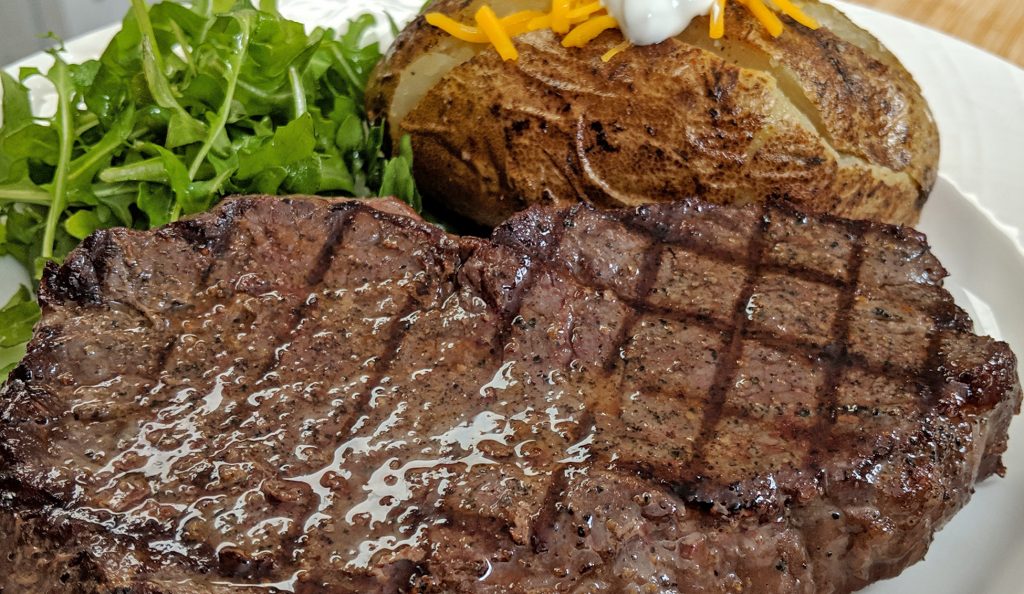
You want to let the steak rest for at least ten minutes before cutting into it. That will let the juices redistribute and keep it nice and juicy. I don’t think you need it, but most steaks you get in a steak house are finished with a little butter on top. Like I said, though, I really don’t think you need it.
I used to have Steakhouse envy because it seemed they knew a secret I didn’t when it came making a great steak. No longer. With the Reverse Sear and Rule of 5, now I can make a perfect steak at home! So can you!


The Perfect Steak
Ingredients
SO WHAT YOU'RE GONNA NEED IS:
- 1/2 lb New York Strip Steak (about 1/2 lb.) or Top Sirloin
- To taste Salt
- To taste Pepper
- 1 Tablespoon Avocado Oil
Instructions
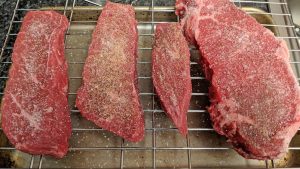
- Season Steak on both sides with Pepper and a generous portion of Salt.
- Place seasoned Steak on a Wire Cooling Rack over a Baking Sheet.
- Place uncovered in the refrigerator for 8 hours to overnight. (Note: I like to season the Steaks in the morning so they’re ready to go for dinner). (Note: if you don’t have 8 hours, season Steak right before cooking and use a paper towel to blot the Steak dry.)
- Remove Steak from refrigerator and place it on a Baking Sheet lined with Aluminum Foil.
- Insert Meat Thermometer in the thickest part of the steak.
- Bake Steak in the Oven at 275°F (135°C) until the steak is 25°F less than your desired final temperature. (Note: see cooking temperatures at www.tinykitchen.net) (Note: while the steak is in the oven, heat up your Cast Iron Grill pan or turn on your BBQ grill to high)
- Remove Steak from oven and place it on Cast Iron Grill Pan. After the temperature of the steak increases 5°F, give it a 1/4 turn to create great grill marks. Cook for another 5°F.
- Turn Steak over and cook for another 5°F. Give it a quarter turn and cook for another 5°F. Remove the Steak from the pan and place on a plate to rest 10 minutes. (Note: you should be 5°F from your final temperature. This is OK because the residual heat will continue to cook the steak and you will hit your desired temperature with no problem.)
Leave a Reply