
Few things remind me more of this time of year than deviled eggs. Why? Well, Easter always falls around this time of year (this year, it’s THIS Sunday)…and when you’re a kid, that means you decorate egg after egg after egg.
Shhhh! Don’t Tell Anyone.
Our basic recipe was 1/2 cup boiling water, 1 teaspoon white vinegar and food coloring (the more varieties, the better). We went through a lot of decorating variations over the years. When me and my sister were young, that meant solid-colored dyed eggs that we would carefully balance on our homemade egg dipper. None of those perfectly crafted octagonal egg dippers for us…nope. Dad would make ours out of old wire hangers…bending them perfectly with his needle-nose pliers. Worked like a charm!

My Work of “Art”
As we got older, the fancier our eggs got…dual-colored or tri-colored eggs. Oh, and I almost forgot, there was that one year that we convinced our parents to buy the box of stuff to shrink-wrap the eggs with intricate pictures of bunnies and fields. They never looked as good as the commercial, though, and like clock-work we were back to dipping the following year with our standard recipe and homemade dippers.
One of our favorite techniques was to take a white (or neutral-colored) wax crayon and draw or write on the eggs first. Then dip them. The areas covered with the crayon would resist the food coloring so you could make all sorts of designs or write your name on the eggs…which seemed to be my go-to. I wanted to make sure everyone knew which eggs were mine.
No matter how we decorated our eggs, two things remained true. First, the Easter Bunny was one clever hare, hiding our eggs in ridiculous places…so much so that our parents didn’t even know where the final one or two were. Second, once collected, the delicious result of those eggs were an opportunity to make some great recipes like egg salad sandwiches or my favorite, deviled eggs!
I always loved how our deviled eggs were never totally white. Some time the die would go through the shell and so we would have remnants of red and blue on our eggs. Oh…but they still tasted fantastic.
The funny thing is that I never knew what the “red stuff” was until I got older. My Mom used to say it has no taste…it just makes the eggs look fancy. And it did. But I think the reason it had no taste is because it was used once a year on deviled eggs and the jar we had probably is still in my Dad’s homemade spice rack in our kitchen in Colorado. Another reason is that paprika tends to respond to heat in order to “awaken” it’s flavor…and there is no heat as a deviled egg topping.
Well, since those days, I have come to have a real appreciation for good (also known as “fresh”) paprika, which are actually air-dried sweet peppers or chili peppers, depending on where in the World it is made. It just loves seafood, whether a broiled fish or sautéed shrimp, it adds just a hint of a smoky flavor.
But I digress…
Back to making eggs with the dozens of leftover eggs that we had from Easter. I wanted to find a fancy deviled egg topping that would be different than the paprika, but that was also super easy to execute. So, of course, my first thought was to go to Eggs partner-in-crime…that is,
BACON!
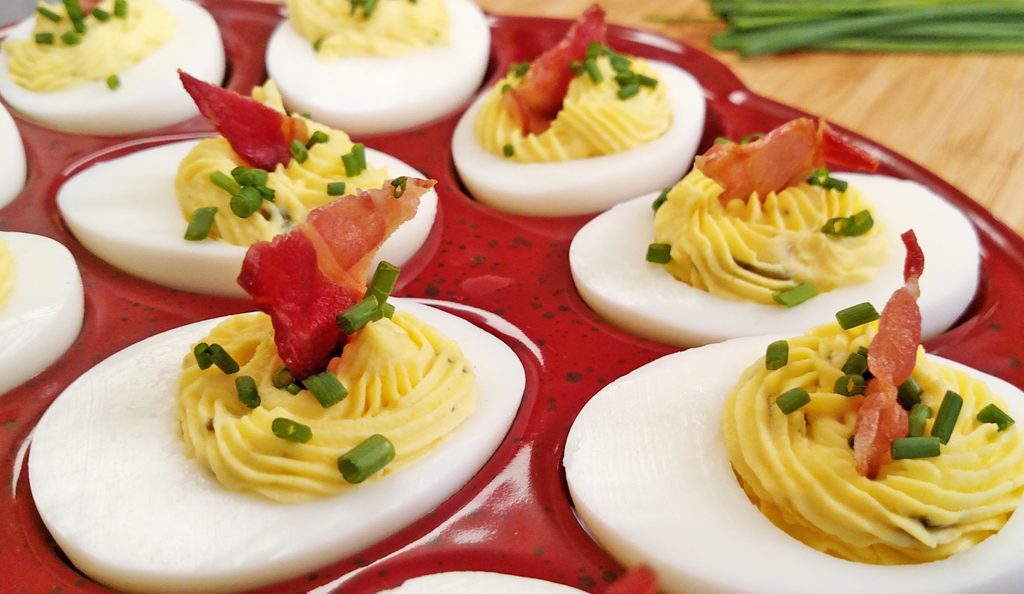
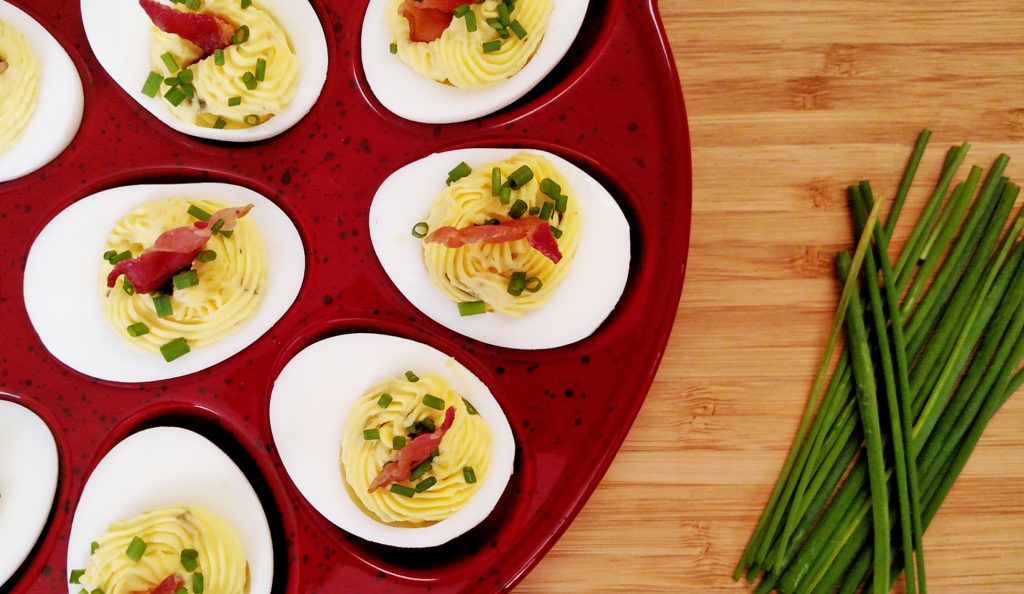
One topping done. Hmmm…what else would be tasty and fast??? Well growing up, we had a bit of a spice garden and one of my favorite items was the chives that would cut up and sprinkle into baked potatoes…and so in my thoughts of nostalgia, I decided that CHIVES would make a perfect second topping, adding a hint of onion spice. I thought it would balance nicely with the smoky bacon and uber-creamy eggs! And it did…taking only a few seconds to slice them in 1mm slices.
In terms of the deviled eggs themselves, let’s be honest, if you just scoop the filling into the eggs, they’re going to be tasty and good….they just may not have the visual appeal that they would if you piped them in. But not everyone has a cake decorating bag and fancy tip. No problem…you’re still invited to the piping party. Just get one of those resealable plastic bags in your pantry and fill it up with filling…then snip off the tip to give you about a quarter-inch hole. Then you can pipe in the filling and get some bonus points for beautiful presentation.
I can’t wait for you to try the Tiny Kitchen take on Deviled Eggs. I also can’t wait for you to share some of your ideas for other toppings that would be good! And if you’re someone who celebrates Easter, I hope it’s a wonderful and meaningful holiday for you this year!! He is Risen!
Enjoy the eggs and I’ll see you next week with another tasty Tiny Kitchen Big Taste recipe!

Heavenly Deviled Eggs
Ingredients
SO WHAT YOU'RE GONNA NEED IS:
- 6 Eggs
- 3 Tablespoons Mayonnaise
- 1 Tablespoon Sweet Relish
- 1 teaspoon Mustard
- To taste Salt
- To taste Pepper
- 1 slice Bacon
- 2 Tablespoon Chives
Instructions
Make the Hard Boiled Eggs
- Place a single level of Eggs in a Large Pot (Note: don’t overcrowd the pot).
- Fill pot with cold water until water level is about 1 inch (2.5 cm) above the Eggs.
- Place pot on stove over High heat and bring water to a boil.
- When it reaches a boil, cover Pot. Remove from heat and let sit for exactly 12 minutes (for large eggs)
- Immediately shock in Ice Bath (large bowl filled with ice cubes and water) to stop the cooking. After a few minutes, they’re ready to peel.
Make the Filling
- Cut peeled Eggs in half lengthwise. Remove yolks and place yolks in a small bowl. (Note: sometime squeezing the side of the egg halves with light pressure will help to dislodge the yolk easily from the white.) Rinse eggs whites in water to remove any leftover yolk. Set whites aside.
- Mash egg yolks with a fork.
- To mashed yolks, add Mayonnaise, Mustard, Salt and Pepper. Mix until creamy.
- Fold in Pickle Relish.
Put ‘em Both Together
- Place filling in Pastry Bag with Star tip. (Note: if you don’t have a pastry bag, place filling in a resealable plastic bag and snip off the tip.
- Pat dry Egg whites with a paper towel to remove any remaining water.
- Pipe filling into egg whites.
- Cut chives into about 1mm segments and garnish the top of the Eggs.
- Cut a slice of cooked bacon into triangles (you can get about 12 triangles out of one regular slice) and place a triangle of bacon in the center of filling of each egg like a little flag.
Leave a Reply